Every Thanksgiving I try a new turkey method – different turkey, different brine, different roasting method – and though I’ve had a lot of really good results, I’m never convinced enough to call a winner. Some are easy but meh, or great but too messy/involved.
Last year I tried two new approaches: 1) splitting the turkey in half (a cheater’s version of spatchcocking) and 2) dry brining. Much to my surprise, both methods made the whole turkey process much easier – and just as good – as any other year. Here’s the lowdown, if you want to try one, or both:
Dry brining: Just salt and time – that’s all there is to it. Sprinkle your bird the Sunday before Thanksgiving, and that’s pretty much all the prep you need. Dry brining, a salting technique used by the late Judy Rodgers of San Francisco’s Zuni Cafe to produce her legendary roast chickens, gives turkey excellent flavor without the mess and refrigeration issues of wet brining. I’m officially over trying to safely store a toddler-sized poultry carcass sloshing in seasoned water.
Splitting the turkey: A split bird cooks in half the time of a whole one, freeing up valuable oven space on the big day. And in the fridge, two halves of a turkey take up much less space than one hulking body.
Regular spatchcocking (also less-accurately called butterflying) – easily managed with sharp kitchen shears on a chicken – is a daunting task on a heavy, slippery, 20-plus pound turkey. But I tried an alternate method from the Kitchn that easily splits the front half of the bird from the back half, allowing the white meat to cook separately from the dark.
Normal spatchcocking of a bird is kind of like slitting open a round globe and flattening it into a map of the world. First you cut along either side of the backbone and remove it. Then you open up the body and force down on the breastbone to collapse it, pressing the breast down so that the whole bird splays out more or less flat.
In the Kitchn’s method, you completely slice the two sides of the bird, separating the breast/wing front half from the thigh/drumstick back half. The white meat now cooks separately from the dark meat, and you can remove one half from the oven if it is ready before the other half is done.
As with regular spatchcocking, you can fully season both sides of the meat instead of having the undersides inaccessible in the turkey cavity. And all the skin is on top, giving you more brown crispness to go around.
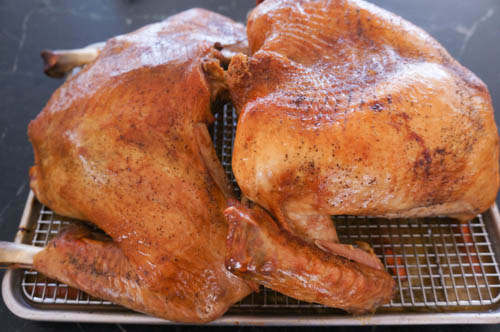
The split turkey can cook at hotter and faster than a whole turkey. It’s a revelation to realize you can cook a turkey in 45 minutes instead of several hours. Even the largest turkey, which might take 5-plus hours when roasted whole, is done in two hours when cooked in half.
Of course, there’s no stuffing the turkey after you cut in half. But it’s generally not recommended to stuff the bird anymore anyway, for food safety and because a stuffed turkey is harder to cook evenly. Dressing cooked in a pan is not quite the same as stuffing flavored by turkey drippings, but beaten eggs also do a good job giving it the richness and moistness it needs.
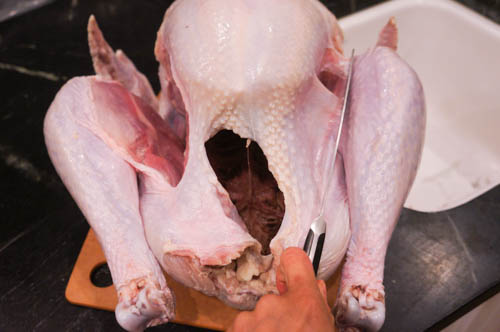
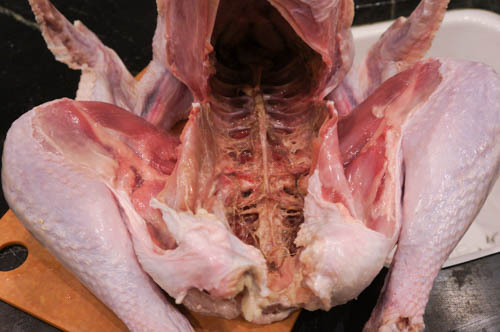
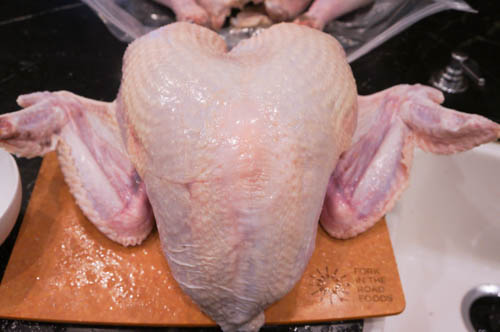
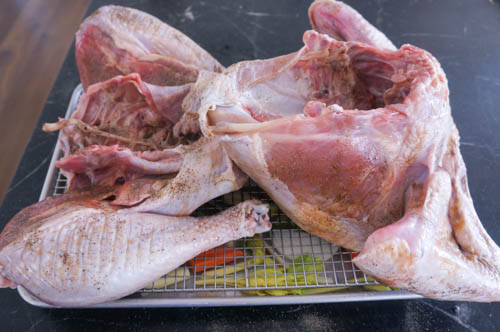
I managed to take a few pictures of my turkey halving last year, with my slimy hands. The procedure was a little like frog dissection from school, though much easier and thankfully without the formaldehyde.
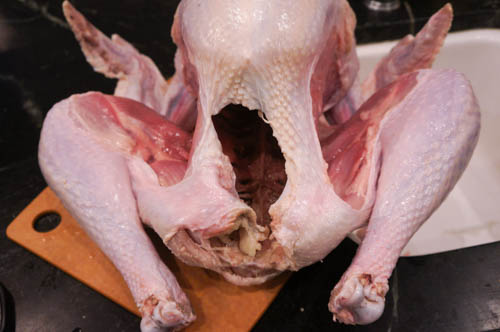
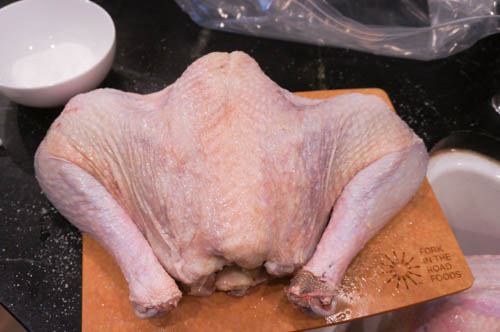
Place the turkey breast-side up on a cutting board. Use a knife or kitchen shears to cut the thin skin connecting the legs to the breast area.
The legs now fall down and away from the breast, leaving the ribs exposed.
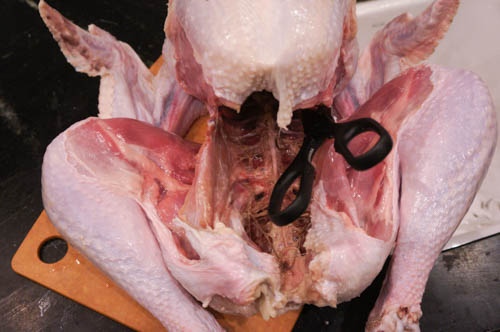
Use sharp kitchen shears to cut up the rib area, along each side of the bird, starting from the cavity opening up toward the wings.
The breast half of the turkey can now open upward, like a wide mouth. Cut a little more to separate the two halves.
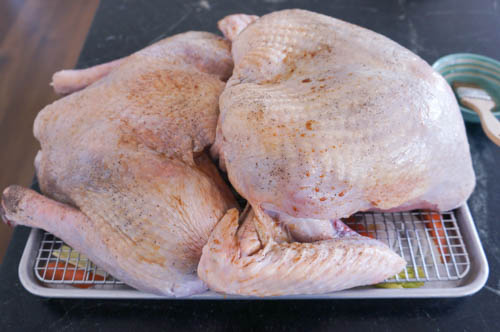
Season the two halves on both sides, using the dry brining approach, if you like.
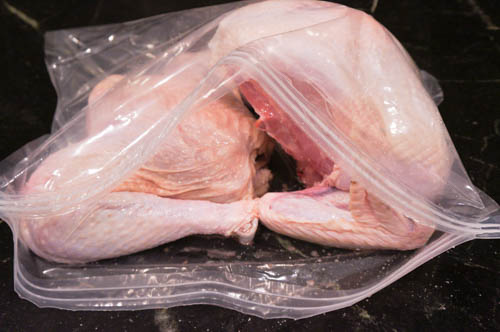
Store the turkey in a large brining bag in the refrigerator. If you take it out of the bag Wednesday night and leave it uncovered in the fridge, you’ll have drier – and crispier – skin on Thanksgiving.
Roughly cut vegetables underneath the turkey flavor pan juices and help prevent them from burning (a split bird can roast at a higher oven temperature than a whole turkey).
Baste with melted butter or oil. Or, as my mom does, use a mix of oil and soy sauce, which adds gorgeous color.
Turkey express, cooked in no time. A small turkey may be done in as little as 30-40 minutes, where a very large bird might take two hours. You could even grill it.
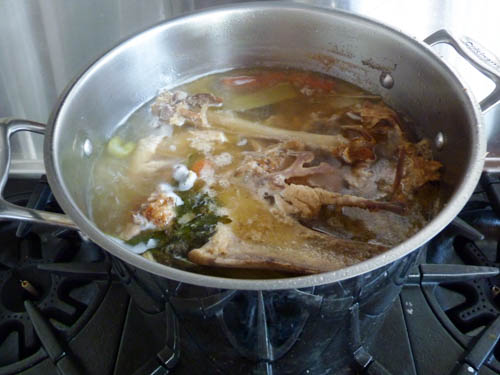
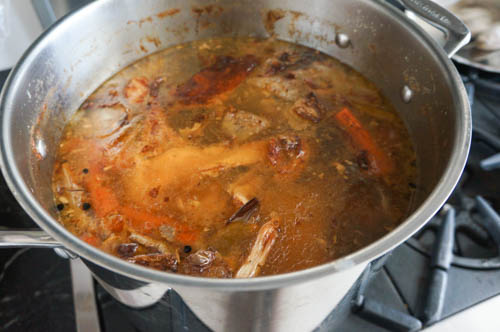
After you carve the turkey, throw the bones in a bag. The next day, when all you want to do is sit around, just toss the bones in the largest pot you have, throw in a couple onion halves, some carrots, celery, peppercorns and bay leaves, and let it simmer forever while you laze around eating leftovers (just don’t let it boil – it’ll make the stock murky instead of clear).
I used to worry about best way to flavor my stock. Now I just throw it all in a pot, because it’s better to get it done than not.
After a couple hours, the bones will collapse down. Keep it going for as long as you want – it will only get more flavorful and concentrated. Season with salt at the end. If I’m not making it into soup right away, I pour it into mason jars for storage.
I have detailed directions here:
Oh, and I just added a Thanksgiving section at the end of my recipe index! I’m copying it here for your convenience.
THANKSGIVING
Appetizers/starters
- Cranberry tea [post] [printable]
- Alice Waters’s carrot soup [post] [printable]
- Spinach dip (without the mix) [post] [printable]
- Three-ingredient artichoke dip [post] [printable]
Turkey
- Thanksgiving turkey, dry brined
- Thanksgiving turkey, split and roasted
- Creamy chicken and rice soup (for leftover turkey) [post] [printable]
- Macho salad (for turkey leftovers) [post] [printable]
Salads
- Balsamic vinaigrette [post] [printable]
- Quinoa arugula salad [post] [printable]
- Arugula, pear and parmesan salad [post] [printable]
- Fennel, orange and avocado salad [post] [printable]
- Candied walnuts (or pecans) [post] [printable]
- Shredded kale and brussels sprout salad [post] [printable]
- Kale salad with cranberries and toasted walnuts [post] [printable]
- Wild rice confetti salad [post] [printable]
Sides
- Bread stuffing for a crowd [post] [printable]
- Easy cranberry sauce [post] [printable]
- Green beans with feta and balsamic vinegar [post] [printable]
- Quinoa with sweet potatoes, red pepper and feta [post] [printable]
- Roasted butternut squash [post] [printable]
- Roasted cauliflower with parmesan and olives [post] [printable]
- Roasted fennel with parmesan [post] [printable]
Desserts
- Apple pie with crumb topping [post] [printable]
- Apple snacking cake [post] [printable]
- Cinnamony apple crisp [post] [printable]
- Gingerbread cake [post] [printable]
- Pear torte [post] [printable]
- Pecan pie (no corn syrup) [post] [printable]
- Persimmon bread [post] [printable]
- Pumpkin applesauce cake [post] [printable]
- Pumpkin chocolate chip cookies [post] [printable]
- Derby pie [post] [printable]
- Caramel dip for apples [post] [printable]



May I ask what the ratio is of oil to soy sauce that your mom uses? I’m with you…25 years of making Thanksgiving turkey and I keep experimenting in hopes of finding “the one”. Last year I did a full spatchcock but it was a pain. Definitely going to try this method this year!
hi kristin – my mom just bastes first with soy sauce, and then with oil or melted butter. good luck, and happy thanksgiving!
Thank you! I cut the bird in two today and made up a dry brine with your suggestions. It is happily resting in its plastic sleeping bag in the fridge :). I hope you have a wonderful Thanksgiving!
hi kristin – your comment reminded me to get my turkeys done too! i split mine and salted it, and then i went to my mom’s and prepped hers too. 🙂 happy thanksgiving to you!
I was lazy this year and threw my turkey carcass into the freezer instead of making stock right away, but I think I’m going to bust it out tomorrow night. Thanks for the tip on how to keep my stock from becoming cloudy. I never knew that before!
hi jillian – your kitchen is going to smell so good! keep your simmer low, and your stock will be clear and golden. =)